
There’s something incredibly satisfying about turning one Hoya into two.
I still remember taking my very first cutting. I placed it in a glass of water, checked it every day, and convinced myself it wasn’t doing anything. Then one morning I noticed a tiny white root pushing out from the node. It was only a few millimeters long, but I was hooked.
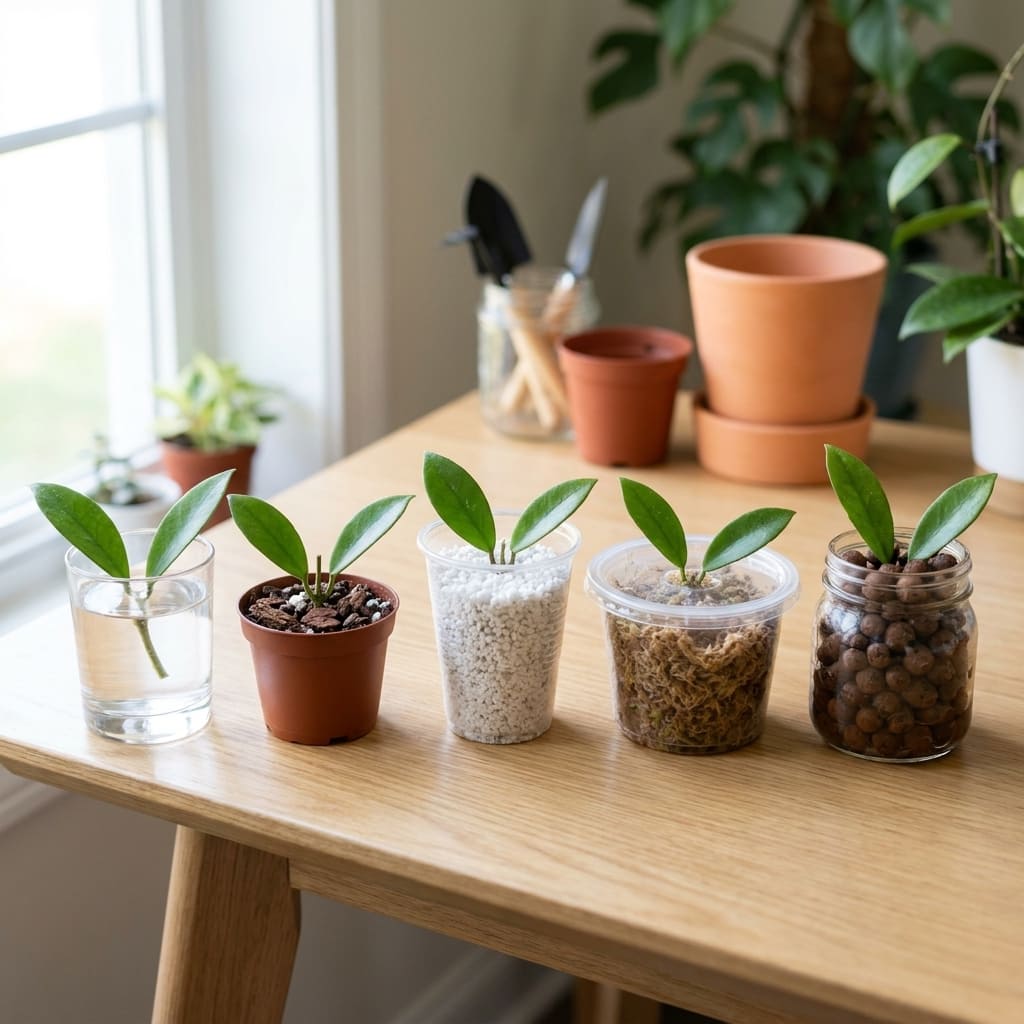
Since then, I’ve rooted Hoyas in water, soil, perlite, sphagnum moss, and even LECA. Some methods worked beautifully. Others taught me lessons the hard way.
If you’re wondering which method is best, the short answer is this:
There isn’t one perfect method for every situation.
The best choice depends on your experience, your environment, and even the type of Hoya you’re propagating.
In this guide, I’ll show you exactly how I root Hoya cuttings, compare the most popular methods, explain what beginners often get wrong, and help you choose the method that’s most likely to succeed.
Quick Answer
If you’re new to propagating Hoyas, here’s my recommendation:
🥇 Perlite – Best overall success rate.
🥈 Water – Easiest method for beginners.
🥉 Soil – Great once you understand watering.
🌿 Sphagnum Moss – Excellent but requires careful moisture control.
💧 LECA – Works well after you gain some experience.
Every one of these methods can produce healthy roots when done correctly.
The real secret isn’t choosing the “perfect” medium.
It’s giving the cutting the right conditions.
Which Rooting Method Is Best?
| Method | Success Rate | Beginner Friendly | My Rating |
|---|---|---|---|
| Perlite | ⭐⭐⭐⭐⭐ | ⭐⭐⭐⭐☆ | ⭐⭐⭐⭐⭐ |
| Water | ⭐⭐⭐⭐☆ | ⭐⭐⭐⭐⭐ | ⭐⭐⭐⭐☆ |
| Soil | ⭐⭐⭐⭐☆ | ⭐⭐⭐⭐☆ | ⭐⭐⭐⭐☆ |
| Sphagnum Moss | ⭐⭐⭐⭐☆ | ⭐⭐⭐☆☆ | ⭐⭐⭐⭐☆ |
| LECA | ⭐⭐⭐⭐☆ | ⭐⭐⭐☆☆ | ⭐⭐⭐⭐☆ |
There isn’t a bad option here.
Each one simply has different advantages.
We’ll look at each method in detail later in this guide.
Before You Cut Anything
One of the biggest propagation mistakes happens before the cutting ever touches water or soil.
People take the wrong piece of the plant.
Unfortunately, even perfect care can’t save a cutting without the right starting point.
Before making your first cut, make sure your Hoya is healthy.
Avoid taking cuttings from plants that are:
- Stressed
- Wilting
- Fighting pests
- Showing signs of disease
- Recently repotted
Healthy parent plants almost always produce healthier cuttings.
What Makes a Good Hoya Cutting?
Whenever I propagate a Hoya, I look for four things.
✅ Healthy stem
✅ At least one node
✅ One or two healthy leaves
✅ No signs of pests or disease
That’s it.
You don’t need an enormous vine.
In fact, smaller cuttings often establish themselves faster because they spend less energy supporting extra leaves.
The Most Important Part: The Node
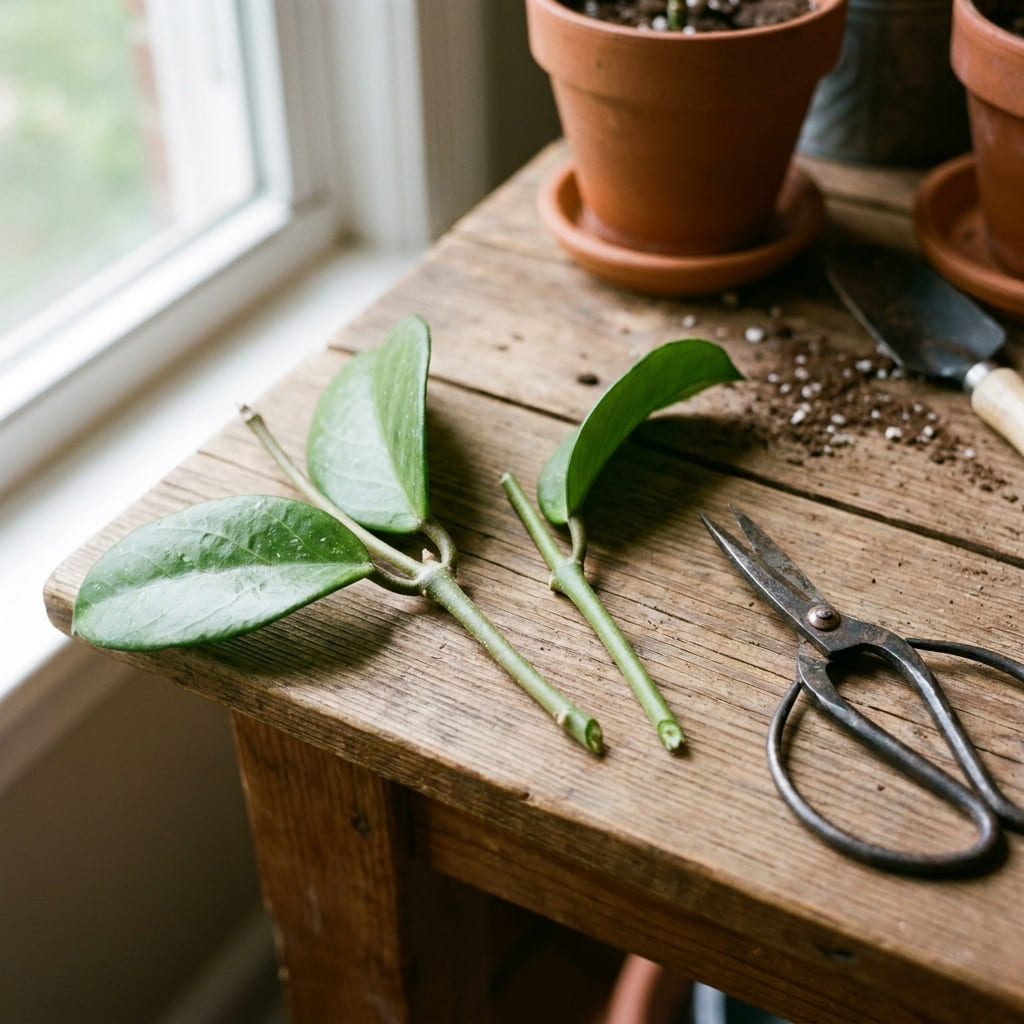
If there’s one thing I wish every beginner understood, it’s this:
Roots don’t magically appear from anywhere.
They grow from the node.
A node is the small bump where leaves and new vines grow from the stem.
Without a node, your cutting might survive for a while…
It may even grow roots from the leaf itself…
But it will never become a new plant.
Whenever someone tells me their Hoya has rooted but hasn’t produced any new growth after months, the first thing I ask is:
“Did your cutting have a node?”
More often than not, the answer explains everything.
Can You Propagate a Hoya From Just a Leaf?
Technically…
Yes.
But there’s an important catch.
A single Hoya leaf can sometimes grow roots.
Unfortunately, roots alone don’t create a new plant.
Without a node, that leaf has nowhere to produce a new vine.
You’ll end up with what many growers call a zombie leaf—a healthy-looking rooted leaf that never grows another stem.
If your goal is to grow a brand-new Hoya, always include at least one healthy node on the cutting.
What You’ll Need
You don’t need expensive equipment to propagate Hoyas successfully.
Here’s what I use most often:
- Sharp sterilized pruning scissors
- Healthy Hoya cutting
- Clean glass or propagation container
- Fresh water (if rooting in water)
- Well-draining propagation medium (soil, perlite, moss, or LECA)
- Small nursery pot with drainage holes
- Optional rooting hormone
- Bright location with indirect sunlight
Simple setups often work just as well as expensive propagation stations.
My Propagation Checklist
Before I start, I quickly run through this list.
✔ Healthy parent plant
✔ Healthy cutting
✔ At least one node
✔ Clean scissors
✔ Fresh propagation medium
✔ Bright indirect light
✔ Warm room
✔ Patience
That last one is more important than most people realize.
Hoyas don’t all root at the same speed.
Some surprise you in a week.
Others make you wait over a month before doing anything at all.
That doesn’t necessarily mean something is wrong.
Common Mistakes Before Rooting
I’ve made nearly every propagation mistake you can imagine.
These are the ones that taught me the most.
❌ Cutting below the wrong node.
❌ Using dirty scissors.
❌ Taking weak cuttings.
❌ Trying to root diseased vines.
❌ Submerging too much of the stem.
❌ Leaving leaves underwater.
❌ Constantly moving the cutting.
❌ Giving up too early.
Looking back, I lost far more cuttings because I interfered too much than because I didn’t do enough.
Sometimes the best thing you can do is simply leave the cutting alone and let nature work.
How Long Does It Take a Hoya Cutting to Root?
This is probably the question I get asked more than any other.
The honest answer is…
It depends.
The Hoya species, temperature, humidity, lighting, and propagation method all affect how quickly roots develop.
Here’s what I typically see under good growing conditions.
| Time | What Usually Happens |
|---|---|
| Days 1–7 | Cutting adjusts, little visible change |
| Week 2 | Root bumps may begin forming |
| Weeks 3–4 | First roots usually appear |
| Weeks 5–8 | Root system begins expanding |
| After 2 months | Many cuttings are ready for transplanting |
Some Hoyas root much faster.
Others seem to do absolutely nothing for weeks before suddenly producing roots almost overnight.
That’s perfectly normal.
Method 1: Rooting Hoya Cuttings in Water
If someone asks me which propagation method is the easiest for beginners, I almost always recommend water.
Why?
Because it’s incredibly forgiving, and more importantly, you can actually see what’s happening.
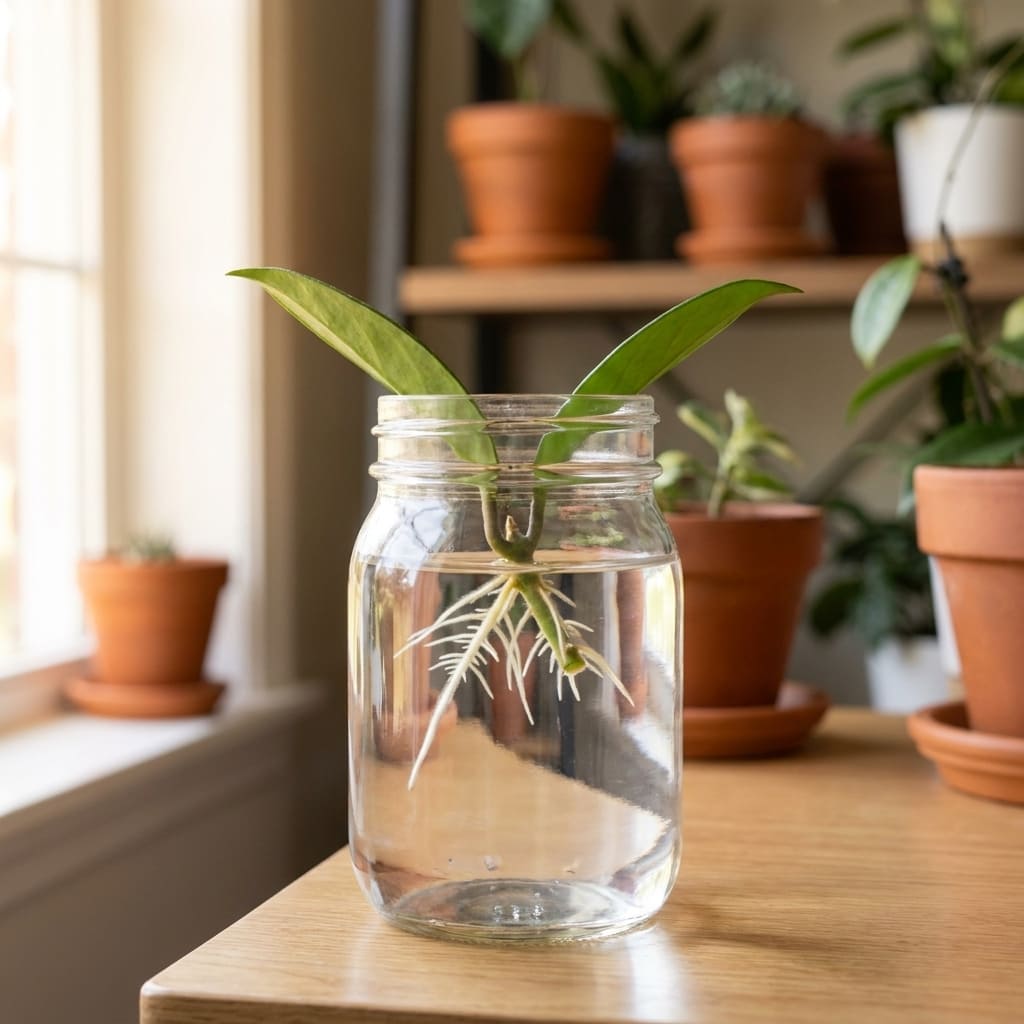
Watching roots develop is not only exciting, but it also lets you catch problems before they become serious.
If a root starts turning black or mushy, you’ll notice it immediately.
That’s something you can’t easily do when the cutting is buried in soil.
Why I Like Water Propagation
Water propagation has several advantages, especially if it’s your first time propagating a Hoya.
Pros
- Extremely beginner-friendly
- Easy to monitor root growth
- No messy potting mix
- Easy to spot rot early
- Great for sharing progress photos
Cons
- Water needs changing regularly
- Roots can be slightly more delicate when transplanted
- Some rare Hoyas root more slowly than in other mediums
Even with those downsides, it’s still one of my favorite methods for beginners.
How to Root a Hoya Cutting in Water
Step 1: Choose a Healthy Cutting
Select a healthy vine with at least one node and one or two leaves.
Avoid cuttings with yellow leaves, soft stems, or signs of pests.
Healthy cuttings almost always root faster.
Step 2: Fill a Clean Glass
Use room-temperature water.
The container doesn’t need to be fancy.
I’ve rooted Hoyas successfully in everything from propagation stations to old drinking glasses.
The important part is cleanliness.
Dirty containers increase the risk of bacteria developing.
Step 3: Submerge Only the Node
This is where many beginners go wrong.
Only the node should sit underwater.
Keep all the leaves above the waterline.
Leaves left underwater usually rot before roots have a chance to develop.
Step 4: Place It in Bright, Indirect Light
Avoid direct afternoon sunlight.
Too much sun heats the water and stresses the cutting.
Instead, place it near a bright window where it receives plenty of indirect light throughout the day.
Warm temperatures between 70–80°F (21–27°C) usually produce the fastest results.
Step 5: Change the Water
I normally replace the water every 5–7 days.
Fresh water contains more oxygen and reduces the chance of bacteria building up.
If the water becomes cloudy before then, I change it immediately.
My Biggest Water Propagation Mistakes
Looking back, these mistakes probably cost me more cuttings than anything else.
❌ Putting too many nodes underwater.
❌ Forgetting to change the water.
❌ Using cold tap water.
❌ Leaving the glass in direct sunlight.
❌ Constantly taking the cutting out to check for roots.
Ironically, the last mistake is probably the one I see the most.
Roots don’t grow faster because we keep checking them.
Sometimes the best thing you can do is simply leave them alone.
When Should You Move It to Soil?
There’s no perfect root length.
Some people transplant as soon as roots appear.
Others wait several months.
Personally, I’ve had the best success when the roots reach about 2–3 inches (5–8 cm) and begin producing small secondary roots.
At that point, they’re usually strong enough to adapt to potting mix without much trouble.
Method 2: Rooting Hoya Cuttings in Soil
This method scares beginners because you can’t actually see the roots.
Ironically, it’s often the method that produces the strongest root systems.
Instead of adapting from water roots to soil roots later, the cutting develops directly in the medium where it’ll continue growing.
That usually means less transplant shock.
Why I Like Soil Propagation
Pros
- Strong root system from the beginning
- No water-to-soil transition
- Less transplant stress
- Very natural growing environment
Cons
- You can’t see root development.
- Easy to overwater.
- Beginners often disturb the cutting too soon.
The biggest challenge isn’t the soil.
It’s resisting the temptation to dig the cutting up every week.
Trust me…
I’ve done it.
It doesn’t help.
Best Soil Mix for Propagation
Heavy potting soil holds far too much moisture.
For propagation, I prefer a light, airy mix.
A simple recipe works well:
- 40% orchid bark
- 30% perlite
- 20% coco chips
- 10% quality potting mix
The goal is to create plenty of air pockets around the developing roots.
Healthy roots need oxygen just as much as they need water.
Step-by-Step Soil Propagation
Step 1: Fill a Small Pot
Choose a pot with drainage holes.
Large pots stay wet longer than necessary.
Small pots make moisture easier to manage.
Step 2: Insert the Node
Bury the node just below the surface.
The leaves should remain above the soil.
Firm the mix gently around the stem so the cutting stays upright.
Step 3: Water Lightly
Moisten the mix evenly.
Don’t soak it.
Propagation soil should feel lightly moist, not dripping wet.
Step 4: Bright Indirect Light
Just like water propagation, avoid direct afternoon sun.
Bright indirect light encourages rooting without stressing the cutting.
Step 5: Leave It Alone
This is honestly the hardest part.
Don’t pull the cutting up every few days to check for roots.
Instead, watch for signs like:
- New leaf growth
- Firm leaves
- Slight resistance if you gently wiggle the stem
Those are much better indicators than digging it up repeatedly.
My Biggest Soil Propagation Mistakes
❌ Keeping the soil constantly wet.
❌ Using heavy potting soil.
❌ Planting too deeply.
❌ Fertilizing immediately.
❌ Checking for roots every week.
Most propagation failures aren’t caused by the cutting.
They’re caused by us trying to “help” too much.
Sometimes patience is the best propagation tool you have.
Water vs Soil: Which One Do I Use Most?
Honestly…
It depends on the Hoya.
If I’m propagating a common Hoya for a beginner, I usually recommend water because it’s easier to monitor.
If I’m propagating one of my own plants and I want the strongest long-term root system, I usually choose soil or perlite.
Neither method is wrong.
The best method is simply the one you’re comfortable using consistently.
Method 3: Rooting Hoya Cuttings in Perlite (My Personal Favorite)
If I could only choose one propagation medium for the rest of my life, it would probably be perlite.
It doesn’t get talked about as much as water propagation, but after experimenting with different methods over the years, it’s the one I’ve had the most consistent success with.
Perlite gives the roots something water can’t—plenty of oxygen.
That extra airflow makes a huge difference, especially for Hoyas that are prone to rotting.
Why I Love Perlite
Pros
- Excellent airflow around roots
- Lower risk of root rot
- Strong root development
- Easy to transplant into soil
- Great for both common and rare Hoyas
Cons
- Dries out faster than other mediums
- Needs occasional watering
- Lightweight and can spill easily
How I Root Hoyas in Perlite
Step 1: Choose a Small Container
I usually use a clear plastic cup with drainage holes.
Being able to see the roots develop is a nice bonus.
Step 2: Fill With Damp Perlite
Notice I said damp, not soaking wet.
Perlite should feel evenly moist but never waterlogged.
If you squeeze it in your hand, water shouldn’t drip out.
Step 3: Insert the Node
Push the node gently into the perlite while keeping the leaves above the surface.
The cutting should stay upright without wobbling.
Step 4: Bright Indirect Light
Exactly like the other methods.
Bright indirect light.
Warm temperatures.
No harsh afternoon sun.
Step 5: Keep the Perlite Slightly Moist
This is probably the biggest adjustment compared to water propagation.
Instead of changing water every week, I simply check the moisture level every few days.
If the perlite starts drying out, I add a little water.
That’s it.
Why Perlite Works So Well
Roots need two things:
- Moisture
- Oxygen
Water propagation provides lots of moisture.
Heavy soil often provides too little oxygen.
Perlite gives you an excellent balance of both.
That’s why I reach for it whenever I’m propagating expensive or hard-to-find Hoyas.
Method 4: Rooting Hoya Cuttings in Sphagnum Moss
Sphagnum moss has been a favorite among Hoya collectors for years.
It holds moisture incredibly well while still allowing air to reach developing roots.
When it’s used correctly, it can produce beautiful root systems.
The problem is…
Many beginners keep it far too wet.
That’s when rot becomes a real risk.
Pros
- Excellent moisture retention
- Strong root growth
- Great for thin-stemmed Hoyas
- Popular among collectors
Cons
- Easy to overwater
- Moss can stay wet longer than expected
- Roots sometimes grow into the moss, making removal trickier
My Moss Routine
I lightly dampen the moss before using it.
It should feel like a wrung-out sponge.
Moist.
Not dripping.
If water pours out when you squeeze it, it’s too wet.
Method 5: Rooting Hoyas in LECA
LECA (Lightweight Expanded Clay Aggregate) has become increasingly popular over the last few years.
If you’ve never used semi-hydro before, it can look intimidating.
In reality, it’s fairly simple once you understand how it works.
Instead of growing in soil, the cutting develops roots around clay balls while drawing moisture from a small water reservoir below.
Pros
- Excellent airflow
- Very low risk of compacted roots
- Cleaner than soil
- Easy to monitor water level
Cons
- Learning curve for beginners
- Initial setup costs slightly more
- Water level needs monitoring
Is LECA Better Than Soil?
Not necessarily.
It simply works differently.
Some growers swear by it.
Others prefer traditional potting mixes.
I’ve had success with both.
Which Method Do I Recommend?
If someone asked me today…
“I’m propagating my very first Hoya. What should I use?”
This would be my answer.
🥇 Water → If you want the easiest learning experience.
🥇 Perlite → If your goal is the highest success rate.
🥈 Soil → If you’re already comfortable watering Hoyas.
🥈 Moss → Great once you understand moisture control.
🥉 LECA → Excellent for growers interested in semi-hydro.
The truth is…
The propagation medium matters much less than healthy cuttings, patience, and proper care.
I’ve seen beautiful Hoyas rooted in old coffee mugs and expensive propagation stations.
The cutting doesn’t care how fancy the container is.
It only cares about having the right conditions.
Should You Use Rooting Hormone?
This question comes up all the time.
My answer?
Usually… no.
Most common Hoyas root perfectly well without it.
Rooting hormone can speed up rooting slightly and may improve success with stubborn cuttings, but it isn’t a requirement.
If I’m propagating:
- A common Hoya Carnosa
- Pubicalyx
- Australis
I don’t bother.
If I’m propagating a rare, expensive cutting that I absolutely don’t want to lose…
Then I might use rooting hormone as a little extra insurance.
Either way, don’t expect miracles.
Healthy cuttings and good conditions matter far more than any powder or gel ever will.
Why Isn’t My Hoya Cutting Rooting?
This is the point where most people start thinking they’ve failed.
A week goes by.
Then two.
Sometimes even a month.
The cutting still looks exactly the same.
No roots.
No new leaves.
Nothing.
The good news?
That’s often completely normal.
Some Hoyas root incredibly fast.
Others seem to do absolutely nothing before suddenly producing roots almost overnight.
Patience really is one of the most important parts of propagation.
10 Reasons Your Hoya Cutting Isn’t Rooting
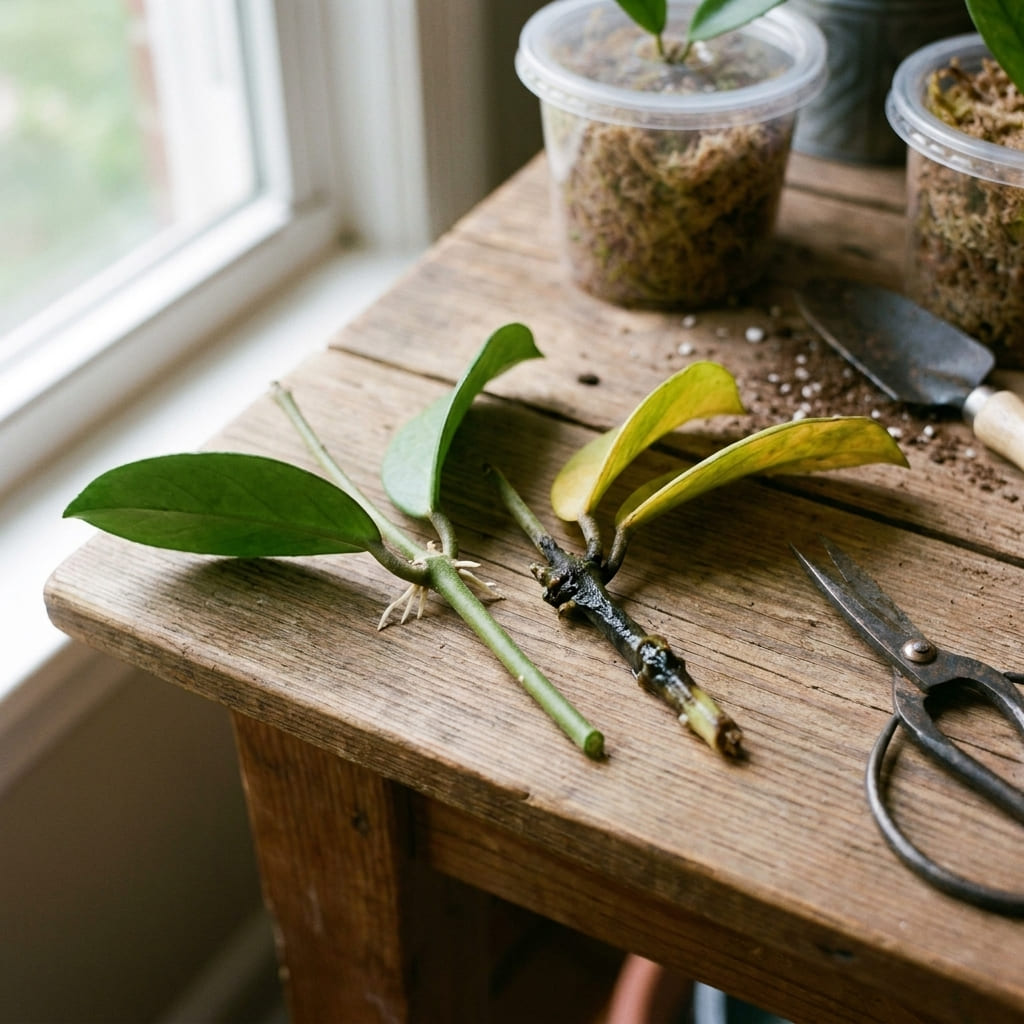
1. The Cutting Doesn’t Have a Node
This is by far the most common reason.
Without a node, your cutting can survive for months.
It may even produce roots.
But it will never grow into a new plant.
Whenever someone tells me,
“My leaf rooted but never grew.”
I already know the answer.
Always make sure your cutting includes at least one healthy node.
2. It’s Too Cold
Hoyas root much faster when they’re warm.
Cold temperatures slow everything down.
I’ve noticed the biggest difference during winter.
The exact same cutting that takes two weeks in summer might take six or seven weeks in a cooler room.
For the best results, keep temperatures around 70–80°F (21–27°C).
3. Not Enough Light
Rooting doesn’t happen well in dark corners.
Your cutting isn’t trying to survive.
It’s trying to grow.
Give it plenty of bright, indirect light every day.
If your home is naturally dark, a small grow light can make a huge difference.
4. Too Much Water
People often think,
“More water = faster roots.”
It doesn’t.
Too much moisture removes oxygen from the cutting, which encourages rot instead of root growth.
Whether you’re using soil, moss, or perlite, keep the medium lightly moist—not soaking wet.
5. Too Little Humidity
Fresh cuttings don’t have roots yet.
That means they lose moisture through their leaves much faster than they can replace it.
If the air in your home is very dry, increasing humidity slightly can help.
I don’t chase extremely high humidity, but around 60–70% usually gives me excellent results.
6. The Parent Plant Was Weak
Healthy cuttings come from healthy plants.
If the parent Hoya was already stressed, fighting pests, or lacking nutrients, the cutting may struggle from the very beginning.
Whenever possible, propagate from vigorous, actively growing vines.
7. You Keep Disturbing the Cutting
I’ve definitely been guilty of this.
Every few days I’d gently pull the cutting out…
“Any roots yet?”
Then I’d put it back.
Unfortunately, tiny new roots break incredibly easily.
Now I leave my cuttings alone unless I have a good reason to check them.
Ironically, they usually root faster that way.
8. The Cutting Is Rotting
Sometimes the problem isn’t that roots aren’t growing.
It’s that the base of the cutting has already started rotting.
Look for:
- Black stem
- Mushy tissue
- Bad smell
- Stem collapsing
If you notice any of these signs, trim back to healthy tissue and start again with fresh propagation medium.
9. It’s Simply a Slow Species
Not every Hoya behaves the same.
Some species root incredibly quickly.
Others take their time.
Don’t compare every cutting to the fastest-growing Hoyas you see online.
10. You’re Just Being Impatient
Honestly…
This is probably the answer more often than people expect.
Propagation isn’t exciting every single day.
Sometimes the best thing you can do is leave the cutting where it is and check it again next week.
My Biggest Propagation Mistakes
Looking back, I learned far more from failed cuttings than successful ones.
These are the mistakes I stopped making.
❌ Taking cuttings without nodes.
❌ Leaving leaves underwater.
❌ Using dirty pruning scissors.
❌ Overwatering soil.
❌ Keeping moss soaking wet.
❌ Digging up cuttings every week.
❌ Trying to propagate unhealthy plants.
❌ Expecting roots in just a few days.
Once I stopped rushing the process, my success rate improved dramatically.
When Is It Safe to Pot Up My Cutting?
One of the biggest mistakes is transplanting too early.
Just because a cutting has roots doesn’t mean it’s ready for soil.
I normally wait until:
- Roots are 2–3 inches (5–8 cm) long.
- Several secondary roots have developed.
- The cutting feels secure when gently moved.
- New growth is beginning.
Strong roots handle transplanting much better than tiny new ones.
If you’re unsure, waiting another week is usually safer than rushing.
Can You Propagate a Hoya in Winter?
Yes, but don’t expect the same speed you get during spring and summer.
During winter, lower temperatures and shorter days naturally slow your Hoya’s growth. That means cuttings often take longer to produce roots.
I’ve successfully rooted Hoyas in winter, but I usually give them a little extra help by:
- Keeping them in a warm room.
- Placing them near a bright window.
- Using a grow light if natural light is limited.
- Avoiding cold drafts from windows and doors.
If you can provide warmth and plenty of light, winter propagation is absolutely possible.
Should You Fertilize Hoya Cuttings?
This surprises a lot of people.
No—at least not right away.
A cutting without roots can’t properly use fertilizer, and adding it too early can actually damage new root growth.
I wait until:
- The cutting has a healthy root system.
- New leaves begin growing.
- The plant has been transferred into its permanent pot.
Only then do I start feeding with a balanced fertilizer at half strength during the growing season.
Can You Root More Than One Cutting Together?
Absolutely.
In fact, I often do.
Planting several rooted cuttings together creates a fuller-looking Hoya much faster than growing a single vine.
The only thing I avoid is overcrowding.
Each cutting should still have enough space for airflow and root development.
Should You Cover Hoya Cuttings With a Plastic Bag?
Sometimes.
If your home is very dry, covering the cutting with a clear plastic bag or propagation dome can increase humidity and reduce moisture loss.
However, there’s one important rule.
Ventilate it regularly.
Completely sealed containers with no airflow encourage mold and rot.
I usually open the bag for a few minutes every day or two to let fresh air circulate.
Propagation Timeline
One of the biggest questions beginners have is:
“Is my cutting taking too long?”
Here’s what I typically expect under good conditions.
| Time | What Usually Happens |
|---|---|
| Day 1 | Fresh cutting taken |
| Days 2–7 | Cutting adjusts to its new environment |
| Week 2 | Small root bumps may appear |
| Weeks 3–4 | First visible roots |
| Weeks 5–6 | Roots begin branching |
| Weeks 7–8 | Many cuttings are ready for potting |
| Months 2–3 | New vine growth often begins |
Don’t worry if your timeline looks different.
Every Hoya grows at its own pace.
Quick Troubleshooting Guide
| Problem | Most Likely Cause | What I Would Do |
|---|---|---|
| Stem turning black | Rot | Cut back to healthy tissue and restart |
| Leaves turning yellow | Too much water or stress | Check roots and reduce watering |
| Leaves wrinkling | Dehydration or root failure | Check moisture and inspect roots |
| No roots after 6 weeks | Cold temperatures or low light | Increase warmth and light |
| Roots growing but no new vine | Cutting has no node | Start over with a proper cutting |
| White fuzzy mold | Poor airflow | Remove affected area and improve ventilation |
| Water smells bad | Bacteria | Replace with fresh water and clean the container |
My Personal Tips for Better Success
After propagating dozens of Hoyas, these are the habits that have made the biggest difference.
🌿 Start with the healthiest parent plant possible.
🌿 Always include at least one node.
🌿 Sterilize your scissors before every cut.
🌿 Give the cutting bright, indirect light.
🌿 Keep it warm.
🌿 Resist the urge to keep checking for roots.
🌿 Don’t overwater.
🌿 Be patient.
Honestly, patience has probably doubled my success rate.
Most failed propagations weren’t actually failures.
I simply didn’t give them enough time.
Frequently Asked Questions
For beginners, I usually recommend water because you can easily monitor root development.
If you’re comfortable with propagation and want my favorite overall method, I’d choose perlite.
Most Hoyas begin producing roots within 2–6 weeks, although slower species may take longer.
Warm temperatures and bright indirect light usually speed up the process.
No.
A leaf may produce roots without a node, but it won’t grow into a complete plant.
Always include at least one healthy node.
Yes.
I usually let fresh cuttings dry for 30 minutes to a few hours before placing them into water or another propagation medium.
This allows the cut to callus slightly and may reduce the risk of rot.
Black stems usually indicate rot caused by excessive moisture, contaminated tools, or unhealthy cuttings.
Trim back to healthy tissue, disinfect your tools, and start again with fresh propagation media.
Yes.
Spring and summer are generally faster, but Hoyas can be propagated successfully throughout the year if they receive enough warmth and light.
If I’m propagating an expensive cutting, I usually reach for perlite because it provides an excellent balance of moisture and airflow while reducing the risk of rot.
Final Thoughts
If there’s one thing I’ve learned about propagating Hoyas, it’s that success has very little to do with luck.
Healthy cuttings, clean tools, warmth, bright indirect light, and patience will get you much farther than expensive propagation stations or special rooting products.
Every grower eventually loses a cutting.
I certainly have.
Don’t let that discourage you.
Each failed propagation teaches you something that makes the next one more successful.
Whether you choose water, soil, perlite, sphagnum moss, or LECA, remember that there’s no single “perfect” method.
The best propagation method is the one you understand, enjoy, and can repeat with confidence.
Before long, you’ll have more Hoyas than you ever planned to own—and you’ll probably be looking around the house wondering where you’re going to put the next one.